


I was inspired by a friend of mine who posted her daughters room on Facebook. Check it out... take a look at that wall, how could you not fall in love? OK. So I went to her house to get the details on the place. She explained that her daughter wanted a princess themed room but Mom didn't want to have to redo the room in 2 years so here is the brilliant compromise. Look closely at the colors on the wall. T.A. (the painter of the wall below) explained that the colors are chips from a princess line of paints, Glidden has some (click here). So the yellow is Bell from the Beauty and the Beast and the Purple is Rapunzel from Tangled... or something like that. What a smart Mommy! Looks very cool and trendy yet has the princesses that daughter was hoping for.
I asked where she found her inspiration and she led me to a wonderful DIY blog post by Smarty Pants. Perfect, clear instructions.
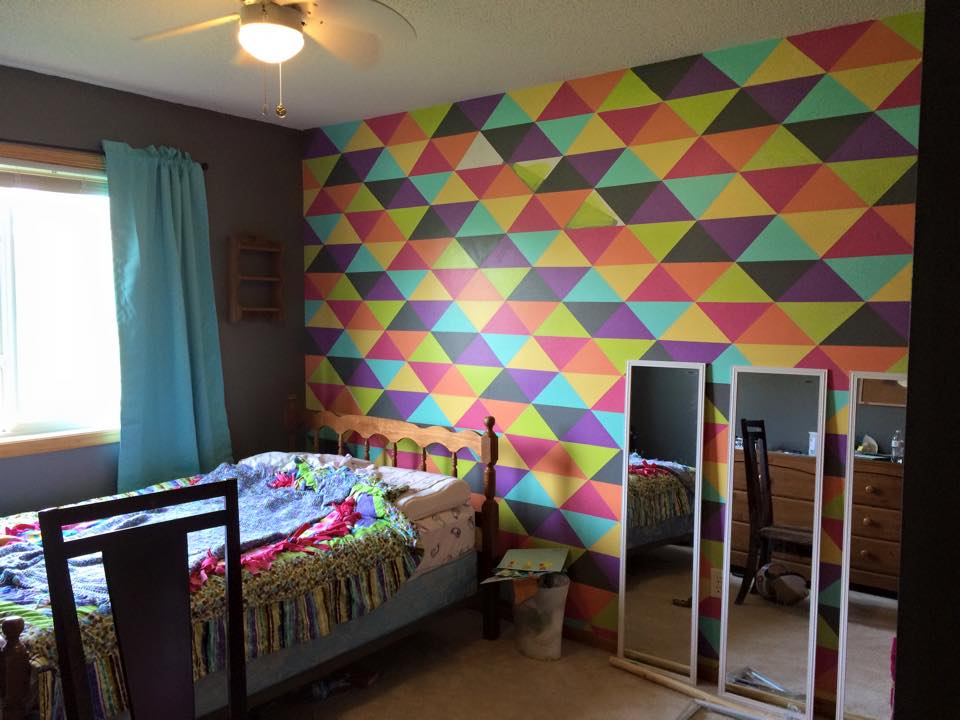
So I went to Home Depot because Behr paint is my favorite. I had some colors for the room already. The door was blue and the walls were gray... I just had to find other fun colors to support this adventure. They had a line called 'Modern' where I found most of the other colors. I only needed samples and a LOT, I mean a lot, of frog tape.

So I started with the small (but more intense) wall first. Not going to lie, there were mistakes and a lot of walking away and coming back after it was dry. This wasn't a one afternoon process, but I'm really happy with it so I think it was worth it.
I FINALLY was able to hang my mosaic that I made under the instruction of an amazing artist Barb Keith. I wanted to make the 'joke' of Snail Mail by putting these two pieces together. I humor myself :)

I reused our current coat hanger by painting it white and adding blocks of matching colors in the place of the pictures I have had in there for years.

 As you can see (in the image below), the other wall has a narrow space to the back closet where the kids get their backpacks and shoes. I had some pictures on that wall and those BIG backpacks and my not so graceful kids fought each other often. I got rid of the pictures altogether and painted some triangles on this wall too. I did what every artist does these days and turned to the internet for inspriation. I found this awesome artwork that you see to the left from JK Kitchen and Bath Design. I used that for my jumping off point and am happy with the results.
 Other details to the room at this time inclued a new HUGE cabnet that my husband made above the washer and dryer. This got all the detergent out of the cupbords in the back of the room that has now become our shoe storage. I found this bike image again while taking the class with Barb Keith. Weird story, as we were down in southern MN for the class there just happened to be an quarky little parade in Whalan MN. It is the Walan Standing Parade... the parade doesn't move... the people do. So dang small town I couldn't help but buy something to remember the day. This work of art was from a vender there that was sitting right on the well known Root River Bike Trail. I bought it to make a goal for our family to ride the trail one day. Happy to say we did that less then a week ago (not the whole thing, but a part). It is an beautiful trail.
I digress... the key holder was found at a flee market and I sprayed it with paint spay as well as the light switch plates an now there is a safe place for our keys.


This is phase one of project laundry room but couldn't wait to share. I have a hanging light and we are going to do a new floor... but that might be next summer. We'll see.
Gorgeous!! Love love love!!
ReplyDelete