

This 'Studio Story' lesson is inspired by Oliver Jeffers book, "It Wasn't Me". I feel in love with the illustrations the first time I picked it up. I love the simplicity. I love the story told without words. Take a look at both the story and some thoughts about the illustrations in the video below.
I have created a digital lesson inspired by this book. I think so often we teach students to 'use an app' when we should be teaching them to 'use a system'. In this case, I will use two apps to prove my point. One of the biggest systems and hardest concepts in digital Art is layers. Layers are used in some of the most advanced digital Art programs such as Photoshop and Illustrator. I used every chance I get to show students as young as 2nd grade how to use the idea of layers in drawing apps.

The first app I want to talk about is Brushes Redux... This app is not very highly rated, but it's one of my favorites for my younger Artist. I like it because it's free! Anything that students can go download at home as soon as they learn it, earns extra points in my book. I also like how simple the program is... but that also means that it's simple... don't expect a TON of options. One thing that Brushes has... LAYERS and that is the 'system' that I'm trying to teach in this lesson.


First, choose a canvas for your image.

Then I change the brush to be solid... I have shown how to do that above... One thing that you can't see is the 'Dynamic' has three settings... I put them all in the middle.

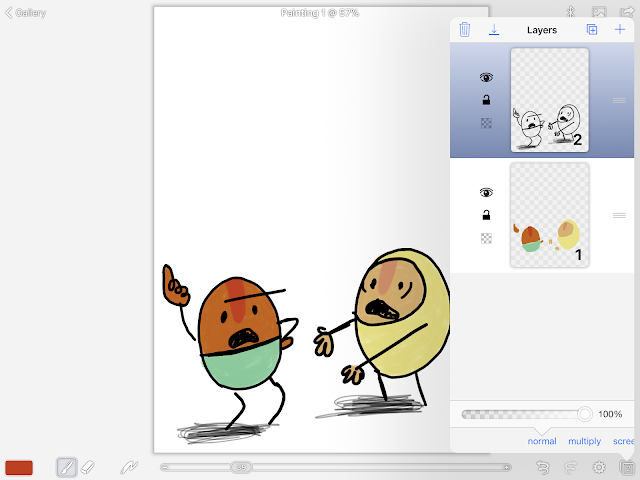
On the first layer, I drew two of the characters from the book. I'm using my finger to draw the simple black lines.

On a second layer, I play with the colors of the characters. I added the colors right over the top of the line drawings. At first is looks like I'm covering up the drawing I just created... but then I 'WOW' the kids with a switch of the layers. There are three lines by the layer and if you press your finger to them, you can move them up or down. This is magic for anyone playing with this app.

With the next step, students are playing with the transparency of the brush. Take a look in the second image where the blue color is being selected. You can see the bar below it allow you to make the brush more transparent or more opaque.


This too will be added onto a new layer.

The last layer bit is the 'discussion' in the bubble... I choose to make this an argument like the book... but I could see leaving this portion of the assignment open-ended so that the viewer must guess what the conversation is by looking at the clues in the bubble and the body language. As you can see, I used a new layer for every color in the 'conversation'. This way I can play with the layers, moving them up and down to create the best composition.


And there we have it.. a finished work of art. If you are using Brushes Redux, it also records your process so when you are completed, you can see the steps you took to make your Artwork... another big 'WOW' portion of this app.


The next app that I used to explore this lesson is Tayasui Sketches Pro... as well as Tayasui Sketches... the free version, and that is really good too... just fewer options. I happen to love this app so I bought the pro version. Also, in my research, I found a Tayasui Sketches School. Not sure what the deal is with this version of the app, perhaps you can get a class discount for your app purchase. Really, all of the apps by Tayasui are pretty amazing. I'm a huge fan! So here we go with this app.

I like on Sketches that you can choose the canvas. Here I have a watercolor paper behind my image. I'm also using an Apple Pencil in these examples, not something we could probably use in a classroom setting for too many Art programs.

As you can see, I'm using the layers as well on this app... It's easy to switch the layers on this app as well as change the 'medium' or brush. It's very intuitive.


My favorite tool on Sketches is the ability to fill a shape with any of these options. It comes in handy! I used it for the speech bubbles in this case.

Again, each layer has some 'conversation' on it. That way I can play with the placement of all the elements by moving the layers up or down. I also had fun with all the 'mediums' or brushes in the side for this portion of the Artwork.

Here is my final artwork above... can you tell what they are arguing about? Below I have several examples of kiddos in my life doing this lesson with me. These examples range from age 6 to 10 years old.


For this lesson, don't get stuck on the app. Think about the system. Use any app that you have available to you and your students.
No comments:
Post a Comment