Wednesday, January 31, 2018

#Crush Announcment


The last two years I have celebrated February with a series called #Crush. This February I would like to continue my #Crush celebration but this time I'm going to crush on Mediums.  See every week since the start of school all of my elementary students have had the same kind of warm up as they enter my classroom. They come in and I introduced them to a new Monster Medium. The purpose of the warm-up is to get students to 1) understand the what the word medium means in Art. 2) To help them recognize different media use and techniques 3) To create some routine fun-- yep, you can have a system set up to have fun. :)


I'll highlight the Monsters a bit more in March when we have brackets to vote for our favorite Monster Medium. This month, I'm going to #crush on different Media. Here is my schedule.  I think it would be fun to hear what your favorite lessons, uses, or techniques are with these mediums. I'll be sure to share some of mine as well! Hashtag your shares with #Crush and tag me on Twitter with @MiniMatisse and on Instagram with @MiniMatisseArt. Something to look forward to this month.

Here is my post on Crayons, Paints, Markers,


Tuesday, January 30, 2018

Four Books to Add to Your Art Studio


I love to use books as the inspiration for my lessons so I thought I would share a couple books that I love to use in my Art Studio. I thought this would be some good timing because February is I Love To Read Month.


Escargot by Dashka Slater, Pictures by Sydney Hanson

I read the book Escargot to my students as we were learning about snails.  It's not really an 'Art Book' per say but it was a lot of fun and my littlest Artist loved to listen to this book when we were creating and playing with snails. Click here to see the lesson I used this book with. 


Windblown by Edward Manceau

This is an EXCELLENT book to teach composition.  I used this as inspiration for lessons on stop-motion animation. As well as simply composition with shapes. For the stop-motion animation student had to use the same shapes to create several different compositions in their animation. The book was a perfect match for the lesson.


They All Saw a Cat, by Brendan Wenzel

I talked about this book in an early post because I used the book an inspiration for my Art To Remember lesson earlier this year. This book is all about perception, how the same object/person can be seen so many different ways because of the perception of the viewer. I think you could use this book in 100 different ways.


You Belong Here, By M. H. Clark, and illustrated by Isabelle Arsenault 

Again, another book celebrated in an earlier post. I adore this book!! It's beautiful in word and in images. It was also some great inspiration for a graphite collagraph

All the books mentioned above are available to you in the playlist below. Please feel free to use them, however, I could never stress enough how wonderful it is to sit down with kids and read a story with a book in your hand. They love it, and I think they feel loved when you are giving them your time, your voice and your attention. 

Saturday, January 27, 2018

Graphite Collagraph


The Art Ed Now is a week away and I'm excited once again be part of this amazing event. This year I'm presenting on how to create and teach a Graphite Collagraph.  Art Ed Now is always one of my favorite ways to get Professional Development. It's quick, easy, and high quality. There is no travel needed. The best part of this conference is that you have access to the sessions after the day... in something they call an 'after pass'. This allows you to revisit the sessions as many times as you need or more importantly WHEN you need the information. Let me tell you, it's a ton of information so having access after is important. Hope to 'see' many of my Art Education friends at the conference. 


Many things came together for me at the same time to inspire the Graphite Collagraph. First, my music teacher coworker asked if I could work with her on the 4th-grade upcoming performance. I was excited to say yes when she showed me what book she was using for her inspiration. You Belong Here, by M. H. Clark, illustrated by Isabelle Arsenault was the book selected. The book is lovely, such beautiful poetry. The thing that got me so excited however was Isabelle Arsenault illustrations. WOW!! Her work speaks to me. I wanted to create something in her style and I felt that graphite is the perfect medium. 


If you were one of the first 1500 people signed up for the AOE conference you received a graphite kits from Derwent. This kit was perfect because it has both the graphite sticks as well as pencils. I used both in this collagraph. 


For the collagraph, I used a heavyweight drawing paper. I drew my design and cut with both scissors and an Exacto knife. I did some negative and some positive shapes in my composition as shown below.


I taped the collagraph to the table and then taped a lightweight paper over the collagraph. I used the side of the graphite sticks by rubbing across the paper adjusting the pressure to the area I was working on. This gave me an outline of the images created.

After the outline of the collagraph rubbing is complete, I remove the lightweight paper. I placed the paper with the outlined rubbing on top of a variety of rubbing plates.  I tried a bunch, all pictured below. I used some heavy duty clay texture plates from Fiskars, some lightweight plastic stencils from WalMart, and a cardboard stencil pack from Target.  I have linked all of these options but I don't know how long the links will be good. Any texture plates could be used I would imagine. This might be a fun place to experiment. 


The final result was so interesting.  I think I could use this same collagraph again and again and have a somewhat different result every time.  This whole lesson and more explanation will be explained at the Art Ed Now conference on the 3rd. I also show some different ways to approach this lesson using watercolor colored pencils and exploring some different materials when creating the collagraph. 

Wednesday, January 24, 2018

They All Saw A Cat- Two Way to Create


I'm catching up with a couple of things from this school year that I just haven't had the opportunity to celebrate. These cats were created earlier this year by the 2nd and 3rd graders.  We did them for our Art to Remember Fundraiser. They turned out wonderful and was a hit with our parents who purchased the products. 


I created this lesson last year and shared it with Art to Remember who has the entire lesson and all the downloads on their website (click here).


I started by reading a book called, They All Saw a Cat by Brendan Wenzel. It's a great book about perception. If you don't have this one, you should think about getting it.  It's beautiful, both in concept and in imagery.


I have taught this lesson many different ways. I have done a very structured version the Art to Remember lesson plan because I wanted the final project to be universally successful. In the past, however, I have taught my students in a more choice based way. This plays into the book a bit better because we can talk about perception a bit more. Both ways were successful and fun for the students.


For the Art to Remember projects, I used tempera cakes and construction paper crayons. These mediums made for a bold image on the ordered products. 


These cats were wonderful and I have heard the excitement from parents over and over.  I heard student exclaim, "This is my favorite Art Project I have ever made." Yes!! That is music to this Art Teachers ears!

Monday, January 22, 2018

Alphabet Soup


A few weeks ago I welcome my first guest blogger to MiniMatisse, Mark Rode. His Paper Dinosaur Sculptures are adoreable, be sure to check them out.  Today I'm honored to present you with an Art Teacher I have admired for years.  Lauralee Chambers has been an Art Educator for 25 years in Westchester, New York.  She teaches over 900 students, 6 sections a day at two different schools with a total of 36 sections in a 6 day cycle. Yep, you read that all right. This woman is a rockstar!  Lauralee not only teaches to the masses but also shares, shares, shares on her Instagram, @2art.chambers and on her Pinterest account, Lauralee Chambers.  This is how I recently saw Larualee's latest and greatest lesson, Alphabet Soup.  She was happy to share with us the process of this adoreable project right here on MiniMatisse.


Lauralee writes:


I have 6 sections of first grade and our classes are 45 minutes every 6 days. I begin this project by telling them that “I know first graders are alphabet experts” and ask them to recite the alphabet to me. I ask them if they know any alphabet books and I tell them that I have been collecting alphabet books for a very long time because I love letters! I share some books in my collection and show them my other assortment of letters objects that I have including my alphabet necklace. I also created a smart board document with many, many images of letters on things, with the last slide being a bowl of alphabet soup.


Day One:

Materials:

  • 9x12 white drawing paper 90lb, or other for painting, with a pre-drawn pencil circle outline
  • Oil Pastels
  • Alphabet letter sheet visuals on tables to help them remember

Process:

After looking at many alphabet visuals and resources, teacher will demo how to draw letters of the alphabet in the circle (bowl) by pressing VERY HARD to put oil pastels down onto the paper. If not done thick enough, soup will cover their letters! I show students how to scatter their letters, rather than putting them in a line like they do for writing. They can go ANYWHERE, upside down, sideways, etc. Rotate the paper for each letter trying to keep them all large enough and thick enough. Colors should be repeated and if there is too much white space left after doing each letter of the alphabet, I have them hide their names in the bowl!


Day Two:

Materials:

Liquid watercolor: I mix up a batch of broth color using yellow and orange and pour into containers for each table to share. This will wash over the letters from last class. Going outside of the lines is fine because teacher will cut circles out so they stay round! This should not take long. Put these away on drying rack and start plaid background “tablecloths”.
  • 12x18 white drawing paper with a larger circle, pre-drawn with sharpie. I traced these circles over to one side of the paper. (This is where they will glue down their soup in next class, as flat and centered as possible.)
  • Water based markers
  • Water containers
  • paint brushes, I like size 10 or 12

The Process:

Add any needed letters, prep for painting, demo washing broth over letters quickly in long strokes. Put these away on drying rack and begin plaid backgrounds.

Each student has 12X18 with a sharpie circle. Gather them around to demo a plaid pattern of vertical and horizontal lines leaving spaces between lines as you wish. I ask them to choose 3 or 4 colors that work well together. Students will need directions on how to JUMP over the soup bowl and continue their line on the other side. A bit challenging for some, but the irregularities add charm! Once drawn, students take a paint brush dip, and wipe, in water and trace/drag over the marker lines. Some chose to trace only over the vertical lines, others did all. Lots of options.
Put on the drying rack. Don’t forget names on the back!


Day Three:

Materials:
  • Soft black vine charcoal broken into small pieces
  • Off white paper or tag board, cut to the size of a folded napkin
  • Glue sticks
  • Plastic metal imitation spoons
  • Glue gun for teacher use
  • Plastic alphabet beads, stickers (optional)-- The beads the photos are from Roylco

Process:

Everything comes together. Students glue their already cut out soup circle into the center of the larger circle and then glue down their napkin paper. Teacher demos the placement of shading. Students apply charcoal to the bottom and one side of the napkin and run along that line with a finger to soften or blur. Also apply charcoal around side and bottom half of the sharpie circle and smear with finger. Teacher will glue on spoons with hot glue.

Before the shadow is added:


After the shadow is added: 


Lauralee writes: The focus of this lesson combines literacy and letter formation/identification with an understanding of mixed media, using more than one art material in a lesson to create something that looks like real life objects.


This lesson is truely a treasure! I adore the end result. I want to thank Lauralee Chambers for sharing and celebrating on her Instagram so often.  A special thank you for being a guest blogger for MiniMatisse. It was so great to learn the process.  For more on the happenings of Chambers classroom visit her Instagram or email her at, lauraleechambers@hotmail.com

Thursday, January 18, 2018

Artist Trading Cards, Abstract Observational Drawing


I love Observational Drawing, in fact, life drawing was one of my concentrations in college. One of the reasons I love it is because you can do it anywhere with anything. When I bring it into the classroom I try very hard to make it motivating... so in this case, we used candy to observe.  I like the candy for many reasons; It's small, it's inexpensive, it's a gift, there are lots of details, and this is going to be used in an artist trading card swap. That means if these cards are sent to another community across the world, food is a great way to communicate culture.

I wanted to make this a little more non-traditional so I 'abstracted-it-up'... Watch the video below to get a feel for the process of this card.


I loved watching the students work on their pre-planning.  It was a great way to really see how they will handle the final card.  I could see what tips I should mention before the final card and get a feel for the kids who will need a little extra guidance.  I can also see who needs more of a challenge and encourage likewise. What do they call that again?? Oh yeah, formative assessment (that's right, art teachers use assessment every day to guide their instruction) 


As the video suggested, we cut and pasted the divided drawing onto one of our amazing cards created earlier this year. This is what allows for artistic choice and makes our cards look unique and complex. Check out all the paper designs I did with my class in this previous post.


The students did a really good job attaching the still life to the ATC but these cards are going to be traveling through the mail to artist all over the world in just a couple of weeks (see Artist Trading Card Swap information),  I wanted to make sure they are really stuck down and have a beautiful finish so I covered each finished card with Mod Podge


We are proud to send these cards out to our #ATCswap friends all over the country and world!


Sunday, January 14, 2018

Bird Sculptures


I have been trying hard to create a beautiful lesson that you can present to your students. After practicing this sculpture with several students in multiple sessions, I'm proud to say I have a lesson ready to share with you.  I have been posting these amazing bird sculptures on Instagram (@MiniMatisse) the last month or so and people want to know... HOW??!! Here it is my friends


Before you decide this is the lesson for you, make sure that you have these materials and tools.  You could also plan on an alternative such as tinfoil instead of paper and masking tape for the armature or a different type of air dry clay instead of CelluClay. I just want you to be sure you are ready to take on this amazing lesson plan before purchase.


Another caution I have for you before taking on this lesson is making sure that you have the time.  This lesson takes no less than 2 weeks to complete (some of those days are drying time for the clay). Just make sure that you can budget enough time... Quality needs time!! 

If you are sure this is the lesson for you, 

If you are not sure, continue reading to see what is all included in this lesson.


All of the steps of this lesson are supported with visual images and most sections have a video support as well.


So here is the break down of the lesson plan.  I have tried to cover some major standards in our National Visual Artist Standards. I, of course, have the standard CREATE. Students are making a bird. REFLECT and CONNECT is found throughout the lesson. Students reflect during their preplanning, when they are giving feedback (activity included), and in an optional digital portfolio.  Students PRESENT by displaying the work or sharing the digital portfolio with parents or on social media. 


This lesson is beefy, no dought! It covers our standards, CHALLENGES our students, and gives an opportunity for voice and choice.  Check out some of the amazing works that my students created this last quarter! 


If you would like to learn how to obtain this lesson, please visit my Teacher Pay Teachers store.

Tuesday, January 9, 2018

Paper Dinosaur Sculptures


I'm so VERY excited to present my very first guest blogger on MiniMatisse.  I met Mark Rode a couple months back at a training and we share our social media information with each other. I have been so impressed with Mark's Instagram that I asked if he would write a blog post about this amazing project. 

Mark is an Elementary Art Teacher at Oxbow Creek Elementary in Champlin Minnesota. He explains that his inspiration came from another teacher in West Australia, Ann Farrell. I'm a fan of her work as well! Please be sure to check out her blog, Use Your Coloured Pencils. Mark maintains an amazing Instagram account, @oxbow_creek_elementary_art. He is also active on Twitter, follow him @oxbowart. Here is what Mark had to say about this captivating project.


I taught this project to my first graders to kick off their unit on form.  It took two 60 minute classes, but next year I may stretch it to three, as it was difficult for some to finish on time.  There are so many great books on dinosaurs too, and having time on the third day for reflection would be ideal.  Nevertheless, I felt like this project was a great way to begin working in three dimensions, as it let students figure out how to make something stand up and occupy real space with familiar materials and subject matter (who doesn’t like dinosaurs?).  After teaching this lesson, I had multiple students bring in other versions to share that they had made at home, as well as some other paper sculptures, which I felt was a good sign.

When I was a kid, I was obsessed with dinosaurs.  I even wanted to be a paleontologist when I grew up! There is still a big part of me that gets excited about them, so it was really fun to share this excitement with the kids.  Of course, in every first-grade class, there are always a few dinosaur experts who love to share their unique knowledge on this subject as well, so I introduced the project by displaying pictures of a variety of dinosaurs and facilitated a lively discussion.  We talked about different characteristics that we noticed, as well as compared and contrasted the different types.

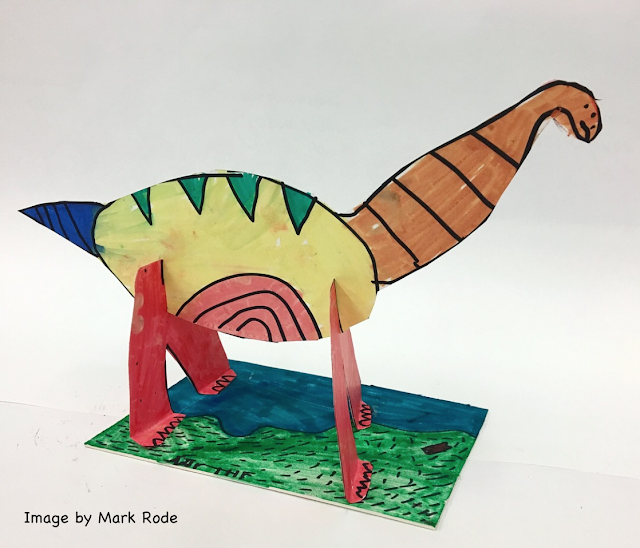
I then told them that they would be making a dinosaur sculpture, and demonstrated how to begin.  I told them that they were going to get two pieces of tagboard, one wide and one narrower.  They would also get a sharpie marker and a stencil for the body shape and legs (these were made from brown tag.  I usually don’t use stencils, but I made an exception with this step, as the success of the final work was heavily contingent on getting these shapes right…).


I told the students to trace the body shape on the large sheet of tagboard, right in the middle.  After that, they added the other features (neck, head, tail, horns, designs, texture, etc.).  I then told them to trace the leg stencil on the smaller sheet.  Depending on the type of dinosaur, they would either do this once or twice (an Allosaurus walks on two legs vs. a Brachiosaurus that walks on four).  After adding details, I told them they had to cut out the dinosaur and the legs.  They then had to flip the body over and add details on the other side (it is important that they cut out first before flipping).


Finally, they added color on all sides with a marker. I told them that scientists don’t know for certain what color the dinosaurs were, so it was really up to them to color their dinosaur how they thought it would have looked.  This, I believe, gave them more creative agency, and I think, in the end, they looked more interesting because of it.


On day two, we reviewed the steps.  I then said that I would give them a piece of matboard for the base and that they had to draw the setting for their dinosaur (bird’s eye view).  They also had to make a few slits (one on the top of each leg and one or two on the bottom of the dinosaur).  I then showed how to make it stand by carefully connecting the slits together.  In order for it to be sturdy, it does require some wiggling and finessing.  When they got to this point, I told them that it was really important for them to try to get it to stand up.  This was challenging for many, but it was good for them to work through it and problem solve.  I also stressed the importance of helping each other out.  Once they got the legs on, I added hot glue to the bottom of the feet and glued the dino to the base.  Most students were able to get it to stand, but there were a few that needed some assistance from me.  At the end of the class, we all had our dinosaurs on one table and it was such a pleasure to see them all together!


This project was predominantly product based, but also gave a lot of room for creative decision-making.  The goal was to have the dinosaur three-dimensional.  The main concept was form, although we also talked a lot about shapes, lines, and textures.

Here are some of the project samples that Mark was so generous to share with us. For more images of this project and so many other amazing projects, please be sure to follow Mark on Instagram @Oxbow_creek_elementary_art