Showing posts with label Why I Teach. Show all posts

Friday, December 14, 2018

Making It Announcement


WE DID IT!!

Billy Kheel is coming to Hassan Elementary. With the funds raised from Art To Remember, and a Donors Choose that I recently put online, we are fully funded to bring this AMAZING Artist to our school.  There so many families that helped fund this opportunity as well as a large donation from Education Closet to bring in Billy Kheel, a Fiber Artist who recently participated on NBC's Making It!


To celebrate, I have some homework for the students of Hassan Elementary.
  1. Watch 'Making It' on NBC.com (Bonus points if you watch as a family)
  2. Look at Billy's Website (https://bkheel.com/)
  3. Or... Take a look at his Instagram... maybe even message him! (click here)
  4. Finally, I'm very excited to share that we are going to do a Making It, Hassan Elementary! This will give everyone an activity to do over the break. Check out the details below. 

Making It Challenge


  • Students must be the primary maker, but assistance can be given by friends and family.
  • Students can work in groups, but it's outside of school time only.
  • The size restriction is 12 inches tall, by 12 inches wide, by 12 inches deep. Art can also be two dimensional but the same restriction of 12" by 12" is applied. 
  • The BIG requirement is the Artwork must incorporate recycled materials. That means some parts of the Artwork must have something in it that was going to be thrown away.
  • The Art can be brought to Hassan Elementary January 29th through February 1st. It will be displayed when Billy comes to visit us in February! 
  • Some students will be awarded an apron for their creativity and use or recycled materials. 
This is going to be amazing! We have so many creative brains at Hassan Elementary! To inspire you as Artist I would like to show you Master Artist who create using recycled materials.


Look close!! Can you see what Federico Uribe used in this work of Art?


Yep, Federico Uribe used colored pencils to create this work of Art. Going to his website (click here), you will discover he uses garden tools, boats, bottles, forks, shoes, and so much more to make his Art.
Related image

How about this butterfly Art by Michelle Stitzlein. What did she use?? You will see licence plates, toothbrushes, records and bottle caps... so many bottle caps. In fact, Stitzlein has created a book of how to use bottle caps in her Art. Please take a look at her website to discover amazing use of recycled materials... and also find out how big these butterflies really are. (click here)


Here's a good idea from Charles Kaufman.  He uses crushed cans to paint on for his recycled Art. That would be challenging, but maybe you want to give it a try at home! Find more from him on his website (click here)
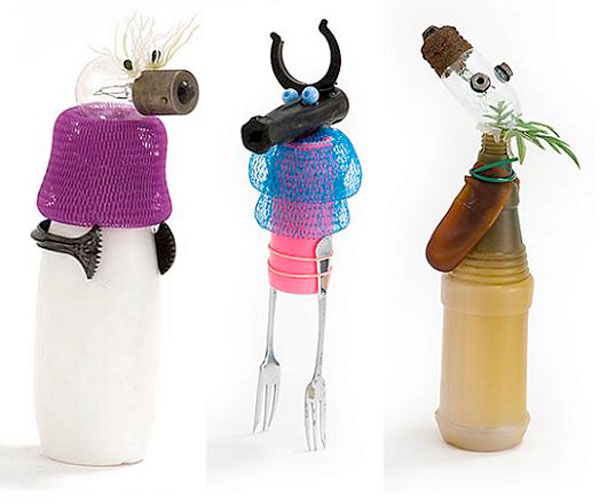

These are really fun projects for the home.  Look around your house as Carolien Adriaansche does.  What do you have at your house to create new 'creatures' from the 'garbage' we toss in the trash. Carolien too has lot's of great ideas on her website. (click here)

Image result for Mario Caicedo Langer website

Maybe this robot is more what you would like to make, you can search the images of Mario Caicedo Langer to find more inspiration like the image above. 

In my research, I ran across this amazing article (click here) that can lead you to lot's of other inspirational Artist for this 'Making It' challenge. I can't wait to see what you come up with Hassan Elementary Artist! 

Sunday, October 7, 2018

Wisconsin Art Education Association Feature Speaker


I have been working hard the last couple of months to get ready for a big event coming up later in October. I have been invited to be a featured presenter at the Wisconsin Art Education Association Fall Conference. The theme this year is 'ART FOR ALL'. I love this theme because it really embraces all aspects of the Arts in Education. I can't wait to see the many ways this theme is interpreted by some of the other speakers! 


I will be joined by many other AMAZING Art Educators throughout Wisconsin as well as Bob Reeker and Jeanne Styczinski. I have had the opportunity to meet Bob Reeker several times in the last year and I'm can say he is fabulous! I have no dought that he will bring an excellence to this conference.  Ever since seeing Jeanne's name on the list of speakers I have been following her work too. She is quite the illustrator and her work is featured throughout Wisconsin on a regular basis. 


I will be presenting two, 1-hour sessions right away. I'll be talking about Artist Trading Cards at 8 AM and then Learning Through Play later at 10 AM on Thursday. I'm passionate about both of these subjects so I'll be pressed for time in the hour... but I'll try to share every bit of information that I can in the time allowed! 


Then I teach three sessions that are 2-hours long, and hands on! We will be sewing a recorder case (or at least getting started on this project. We will be creating family portraits with drawing and watercolor. And finally, learning about sketchnoteing and how to bring it into your classroom. All three of these sessions have been selected because they were successes in my classroom, so I can't wait to share them with the conference attendees. 


I have attended the Wisconsin conferences in the past and let me tell you, it's amazing. These hard-working educators put on one of the best Art Education events of the year. It's worth taking a few days off Oct. 25th and 26th to connect with your tribe! Check out their website to see how to register

Monday, September 17, 2018

Collaborative Paper Quilt


I'm a person who is often inventing my curriculum over and over. I love the creative part of lesson plans. This year, I was greatly inspired by Don Masse of Shine Brite Zamorano who does a collaborative paper quilt every year with his students. I have always been impressed and this tradition is a highlight for Mr. Masse's school.  This year, as I moved schools, I thought... keep it simple, let the kids play, create something beautiful together... This led me to Don's collaborative lesson.  


Here is the deal... I believe that we build off from each other's ideas.  You will often see me highlighting other educators and Artist who have inspired my lessons. I'm sure it's never taught the same, or with the same emphasis, or even materials... That is why we share our ideas, to see where the seed can grow. Don planted this seed and over the years so many people from all over the world have planted that little seed into their own communities and classrooms. LOOK HOW IT HAS GROWN!!

I also believe that if you are going to use someone's lesson, share your tips and tricks with others too. So, here it the slideshow that was presented to my students (K-5) to teach this lesson. When going through the slideshow, you will see our inspirational Artist, Libs Elliot, as well as Don Masse and the links to his students' work. My students would ask me, do you know Mr. Masse, after I had introduced him as one of my BFF's. "When do you see him?" "How can he be your friend, he lives so far away." This was a great opportunity to talk about how I learn from educators and Artist all over the world. They would also ask, "Will you take a picture and show your friend?" Will I? Heck yes! I'll also share it with the whole world if you don't mind. 


Here are a few additional tips and tricks. 


I used the best paper cutter EVER. Every time I put this out there I have people ask... Where?? How?? I need one.  I get it.  I had to cut the white paper with my own 'traditional' paper cutter and it took me, no joke, 4 times longer.  So, yeah... get your self one. They ROCK! (click here)


When I was creating this lesson, I wanted to check off the list that I had reviewed with all my 3rd-5th graders how to glue with a glue stick and white glue. With my 2nd graders, it was an introduction to white glue... and with my K's and 1st graders... we used glue stick only for this lesson.  The 4th and 5th grade would laugh when they heard how I presented the instruction of the glue stick in my YouTube video... I would joke and say, "I know, Right? Well, this is how I teach my littles. You can teach little people in your life in the same way." They would all laugh and think that this was a good idea. But really, many of my 4th and 5th graders are still working on this skill of gluing and all the little tips and tricks really help. 


I had placed a tray at every table with the extra paper. They would put their scraps in there and I would add some little papers here and there. It allowed for the rainbow effect that you see on the wall. I would only divvy up certain colors at a time. The trays also had the scissors and glue in it so it was easy to pick up.  At the end of the day, I would go through all the trays and clean up the paper sheets and get it ready to go for day 2... then 3 and all the way through the 6th day of my digital day rotation. 


For my littles, I had them practice cutting a triangle together. It was many of these kids first day EVER in school (or in my art room) so we really broke it down... "Here is a square, everyone turn it and show me a diamond. Great, now pur the top corner and the bottom corner together.  Now press it down on your table. Now, what shape do you have??" They would call out together, "A triangle!" I love the wonder and enthusiasm of K's. 


I never said, "You're Wrong". See this is the first day in Art Class for these buddies... If a student didn't 'follow the rules', I would let it go. This was not a formal assessment, they will all look amazing on the wall, and if the kid is proud of their work, so am I! 


I would ask students to arrange their 'mini' quilt on a table when completed. This would give the work a little dry time and allow me time to arrange it on the large format after the students have left. This way we both got to practice our composition. As you can see below, I measured out the paper before attaching the individual sheet. I also numbered and marked it for the connecting points so it would be placed upon the wall correctly


I took some training on a practice called ENVoY this summer and I started implementing it right away. One of the practices of this is to have the directions posted on the board.  I'm sure there will be a LOT more writing on some of the ENVoY tips and tricks but in the meanwhile, check out their website


Because kids in the Art Studio have different times that they finished up (Art is an hour long at my school), I was sure to have some 'play' available. I had blocks, toys, cleaning tools, books, and free draw. Only some opportunities were 'opened' depending on the time left in class for the students. 


I had the quilt slowly growing over the last two weeks... this allowed for everyone to see the progress of the Art Project. 


I shared my lesson plan slideshow with my staff. This allowed them to understand what we were doing in class and what to expect.  It gave credit to the Artist, Libs Elliot, and the inspiring teacher, Don Masse. Plus, it gives others the opportunity to collaborate with you... as you see here, a coworker and friend of mine brought in a quilt that her grandma made and she shared it with her students and myself.  It was awesome and filled my heart. 


I labled the work and tried to educate more people with some little tidbits on Libs Elliot and pictures of her work. EVERYONE that uses the school (sports, scouts, and so on...) is in this area of the school at some point.


And yes... I took a picture with the Artwork. I was so proud of getting this done, up, and displayed! It was a big job but yep, I celebrate my students work too... That called for a picture upon completion. 


Thursday, August 2, 2018

Family Portrait Lesson Plan


Today I am presenting at The Art of Education, #ArtEdNow, an online conference for Art Educators featuring Artist and Art Educators. It's specific PD for Arts Education. That is why I love it, it's presenting to my TRIBE!! 


This conference I will be presenting on family portraits.  This lesson is an opening for a big question, What is Family?  It became more than just a pretty picture and more of a conversation between my students identifying the fact that EVERY family looks different. It was a powerful lesson.


If you are attending the conference today, I'm sure your head is swimming with ideas from all the amazing presenters.  I gave you lot's of tips and tricks that worked well in my classroom for this lesson. Most often when I present, teachers want to get ahold of the resources I used.  In this case, one resource is the Hair Reference Sheet. Because we were drawing Dad's in some of the family portraits, we had to talk about how to draw beards. Also, there are so many more hairstyles than what we see in the classroom, so I designed a sheet focused on different ways to create hair. I also spent a lot of time customizing my instruction to individual instruction with this lesson. I have provided this resource sheet on Teachers Pay Teacher if you are interested, click here for the Hair Reference Sheets. 


I also created the lesson itself. Take a look at the following video to get a short overview of what this lesson looks like.


Most of my lessons are in slide format so you are ready to present this via projection. In this case, I have some slides for students and others for teachers. The blue slides are tips, tricks, and things to consider when you are preparing and teaching this lesson. The white slides are instructions for students, prompts for them, students samples to discuss and the steps to create this final product. I took the time to make this lesson great because it's one that I will be teaching over and over for many years to come... it's that powerful.  I don't often repeat lessons, but I will need to for this one. It's a treasure. If you are interested in this lesson plan, please click here for the Family Portrait Lesson Plan.

If you want both, I have created my very first bundle. This is both the Family Portrait Lesson Plan and Hair Reference Sheets for a reduced price. Click here to go to the bundle. 

Friday, July 27, 2018

Chocolate Cherry on a Spoon


I have been given the honor of representing Minnesota at the NAEA Leadership conference. Jessica Jones and I are joining 150 other representatives at a National Convention of how to better run the state and local chapters by learning from each other.  The invitation was tasked with two fun activities right away.  40 gifts for the other representatives in the Western Division and a raffle gift to share with the group.  Jessica and I decided to divide and conquer. I took the mini gifts and she took the raffle.


I wanted to represent Art and Minnesota and what better way to do that then with the Cherry and the Spoon Sculpture by Oldenburg so proudly displayed in the Walker Sculpture Garden. I tried to seek candy makers to help with this task, but no luck... So I chose to take it on myself.


I looked up a lovely receipt from Taste of Lizzy T for chocolate covered cherries.  I'm not going to lie, it took me the whole day but once the cherries were done, the rest was a bit of a breeze...


I used melted chocolate on spoons my son so meticulously bent and placed the cherry's on. I had to tip the spoons up until they were cooled. They stuck... I was shocked :)


Then I packed the spoons up with a little plastic bag.


Finally, I signed it from us in Minnesota but did a little printmaking in the process. The spoon was carved out of an eraser, the cherry was a dab of a pencil eraser and the stem was a marker line on top.  


So, to all my new friends who got a cherry on a spoon, it was so nice to meet you and we learned a ton! Thank you.