Showing posts with label 7th Grade. Show all posts

Wednesday, February 6, 2019

Rainbow Weaving


As many of you know, I have been home for medical leave. I have been using Art as therapy and really excited to discover some new methods of weaving.  One of the lessons I experimented with was this Rainbow Weaving. (click here to go to TPT store) I thought it would really fit in nicely for a middle school.  I couldn't wait to share it with you.

If this lesson looks interesting to you, be sure to watch this video first to make sure you have what you need or are willing to get what you need to create the Rainbow Weaving.


I would also like to mention that this is NOT a beginner project. This project is perfect for an Artist who has a basic understanding of weaving. Fine motor skills and patients will make this lesson more successful. I would suggest this for grades 5th and up. It would be perfect for small group activity like an Art Club, Homeschoolers, or Scout Groups.


In this lesson, I have 3 videos explaining the whole process of this weaving. This allows the viewer to break down the steps, watch it over and over as needed, and pause to create a self-guided lesson that fits them well. The slideshow can be placed on Schoology or shared with students, or it can be presented in group format under the teachers' instruction using projection in the classroom.


There are also step by step images of the project in process. So this lesson has both video and image to support the weaving process.

If you are interested in looking at this weaving for your classroom. I encourage you to visit my Teacher Pay Teacher website

Saturday, January 27, 2018

Graphite Collagraph


The Art Ed Now is a week away and I'm excited once again be part of this amazing event. This year I'm presenting on how to create and teach a Graphite Collagraph.  Art Ed Now is always one of my favorite ways to get Professional Development. It's quick, easy, and high quality. There is no travel needed. The best part of this conference is that you have access to the sessions after the day... in something they call an 'after pass'. This allows you to revisit the sessions as many times as you need or more importantly WHEN you need the information. Let me tell you, it's a ton of information so having access after is important. Hope to 'see' many of my Art Education friends at the conference. 


Many things came together for me at the same time to inspire the Graphite Collagraph. First, my music teacher coworker asked if I could work with her on the 4th-grade upcoming performance. I was excited to say yes when she showed me what book she was using for her inspiration. You Belong Here, by M. H. Clark, illustrated by Isabelle Arsenault was the book selected. The book is lovely, such beautiful poetry. The thing that got me so excited however was Isabelle Arsenault illustrations. WOW!! Her work speaks to me. I wanted to create something in her style and I felt that graphite is the perfect medium. 


If you were one of the first 1500 people signed up for the AOE conference you received a graphite kits from Derwent. This kit was perfect because it has both the graphite sticks as well as pencils. I used both in this collagraph. 


For the collagraph, I used a heavyweight drawing paper. I drew my design and cut with both scissors and an Exacto knife. I did some negative and some positive shapes in my composition as shown below.


I taped the collagraph to the table and then taped a lightweight paper over the collagraph. I used the side of the graphite sticks by rubbing across the paper adjusting the pressure to the area I was working on. This gave me an outline of the images created.

After the outline of the collagraph rubbing is complete, I remove the lightweight paper. I placed the paper with the outlined rubbing on top of a variety of rubbing plates.  I tried a bunch, all pictured below. I used some heavy duty clay texture plates from Fiskars, some lightweight plastic stencils from WalMart, and a cardboard stencil pack from Target.  I have linked all of these options but I don't know how long the links will be good. Any texture plates could be used I would imagine. This might be a fun place to experiment. 


The final result was so interesting.  I think I could use this same collagraph again and again and have a somewhat different result every time.  This whole lesson and more explanation will be explained at the Art Ed Now conference on the 3rd. I also show some different ways to approach this lesson using watercolor colored pencils and exploring some different materials when creating the collagraph. 

Sunday, January 14, 2018

Bird Sculptures


I have been trying hard to create a beautiful lesson that you can present to your students. After practicing this sculpture with several students in multiple sessions, I'm proud to say I have a lesson ready to share with you.  I have been posting these amazing bird sculptures on Instagram (@MiniMatisse) the last month or so and people want to know... HOW??!! Here it is my friends


Before you decide this is the lesson for you, make sure that you have these materials and tools.  You could also plan on an alternative such as tinfoil instead of paper and masking tape for the armature or a different type of air dry clay instead of CelluClay. I just want you to be sure you are ready to take on this amazing lesson plan before purchase.


Another caution I have for you before taking on this lesson is making sure that you have the time.  This lesson takes no less than 2 weeks to complete (some of those days are drying time for the clay). Just make sure that you can budget enough time... Quality needs time!! 

If you are sure this is the lesson for you, 

If you are not sure, continue reading to see what is all included in this lesson.


All of the steps of this lesson are supported with visual images and most sections have a video support as well.


So here is the break down of the lesson plan.  I have tried to cover some major standards in our National Visual Artist Standards. I, of course, have the standard CREATE. Students are making a bird. REFLECT and CONNECT is found throughout the lesson. Students reflect during their preplanning, when they are giving feedback (activity included), and in an optional digital portfolio.  Students PRESENT by displaying the work or sharing the digital portfolio with parents or on social media. 


This lesson is beefy, no dought! It covers our standards, CHALLENGES our students, and gives an opportunity for voice and choice.  Check out some of the amazing works that my students created this last quarter! 


If you would like to learn how to obtain this lesson, please visit my Teacher Pay Teachers store.

Saturday, November 18, 2017

Designing Paper Lesson


I am so excited to post this lesson today because it's something I have been working hard on in the past month.  I'm also excited to see this lesson used in other classrooms because it has been one of the most engaging lessons I have ever done with my students. Allow me to introduce to you, 'Paper Design'!


I share 8 different ways to design paper. Each lesson is clearly marked with a title page and preview of the end result. 
Each lesson also has a supply list. This supply list identifies what was used in the specific process. Each supply list also gives alternative supplies.  When I was listing alternative supplies, I tried to think about what most (if not all) classrooms would have access to. These supplies are common to an Art classroom as well as homeroom classrooms in most cases. 
Then, each lesson has a well lit, close up video of hands in action creating the designed paper. These lessons are ready to show students. Of course they can be viewed as Professional Development and can teach a teacher how to present these lessons to students, however, I have made these lessons to be ready to use in the classroom. I use student-friendly language appropriate for 2nd grade up to high school learners. Each video is 2 minutes to 4 minutes long. These are designed to give students a small amount of information to all students to retain and perform the process independently.
Using this lesson allows students to explore several processes or you can present it to your class to simply try one process instead. This lesson also provides student examples as well as suggestions of how to use the designer paper for a more project-based lesson.  Designed paper can be used for everything from Artist Trading Card Design to collage work.
This lesson can be shared with your students in two ways.  The way I shared this lesson with my class is whole group learning. So I projected the lessons using a computer to my class. I have also designed this so you can share the link with your students and set up stations. This will allow for self -paced learning. Students would need a way to view the lesson at each station via a device such as iPad or Chromebook. This lesson is a Google Slide so you would need an internet connection as well. 

I'm so excited to share this lesson with you today.  Please visit my TPT store for more information! 

To celebrate the release of this new lesson I'm running a sale on my Teacher Pay Teachers Store. ALL self-paced lessons are 20% off through Monday, Nov. 20th 2017. Enjoy!


Wednesday, June 21, 2017

Shrinky Dink Jewelry


This is not the first time I have shared how amazing shrinky dinks are in class on this blog, and it probably will not be the last. As I was wrapping up the school year I wanted to give my 5th graders a WOW project.... in this case, I mean a project that will make them say WOW!! Shrinky Dinks was just the thing!! 


For those of you who did not grow up in the 80's (the first go round of this product) as I did, you may not know what Shrinky Dinks are. It's plastic sheets that you can draw on, cut out, and punch holes in. After you are finished manipulating the plastic, you place it in an oven at 350-ish degrees and watch the magic happen. The plastic shrinks to about 1/3 of its size.  On it's way to shrinkage, it folds and bends and looks like it is being destroyed.  It's quite entertaining to watch. 


A regular oven will work.  You just need a cookie sheet or something oven safe and has a flat surface. In a classroom situation, I have a toaster oven that works well. This way, the students can see first hand the magic.


The materials for my students for this project was a 1 1/2 X 4-inch sheet of plastic (cut down from 8X10), colored pencil/sharpies, an elastic string, and beads. I always get the 'frosted' Shrinky Dink because there is a little tooth or texture to one side that allows the students to use colored pencil or sharpies.  The time allowed to work on this project was about 45 minutes, but most students were done in about a half hour.


I had the students design the plastic (on the rough side of the plastic) using either colored pencils or sharpies. I asked them to keep it as a design rather than words or numbers.  When students use characters, they will often end up backward because there are two sides to this plastic. Once they bring the plastic up to me, I use a hole punch for each end.  I typically punch 3 holes next to each other so there is space large enough for the elastic to easily go through. YOU MUST PUNCH THE HOLES BEFORE SHRINKING!!


For this quick make and take, I gave students elastic and beads.  They strung the elastic through each hole as shown above, and then added the beads. Finally, they tied off the bracelet! I gave the suggestion to add clear nail polish to the knot when they get home to assure it's connection for a longer time.  A little drop of nail polish hardens and makes the knot more secure.  This was a GREAT send off for the class of 2024.  Good luck in the middle school kiddos! 


For a more advanced version of Shrinky Dink jewelry, please see this previous post. or for a more focused lesson on the design of the jewelry, please click here for this previous post

Tuesday, July 26, 2016

Digital Station- Button Sewing


Excited to share another self-paced lesson with you.  This lesson is to teach students how to sew a button.  This life skill is often missed in today's public schools.  I was impressed how even my youngest students were not only successful but also very motivated to learn this skill. 


Last year I place QR codes (and URL's) onto filing folders. I laminated them and introduced them as choice stations to my Kindergarten through second grade. I would have one iPad per station for students to scan and watch a short video about a skill.  This was one of the most popular stations, button sewing.


Early this summer I offered a free digital lesson on Yarn Brading. Please go to my TpT store to download your free gift.  If you are interested in investing this Button Sewing, (click here).

Tuesday, June 3, 2014

Sgraffito Clay Project


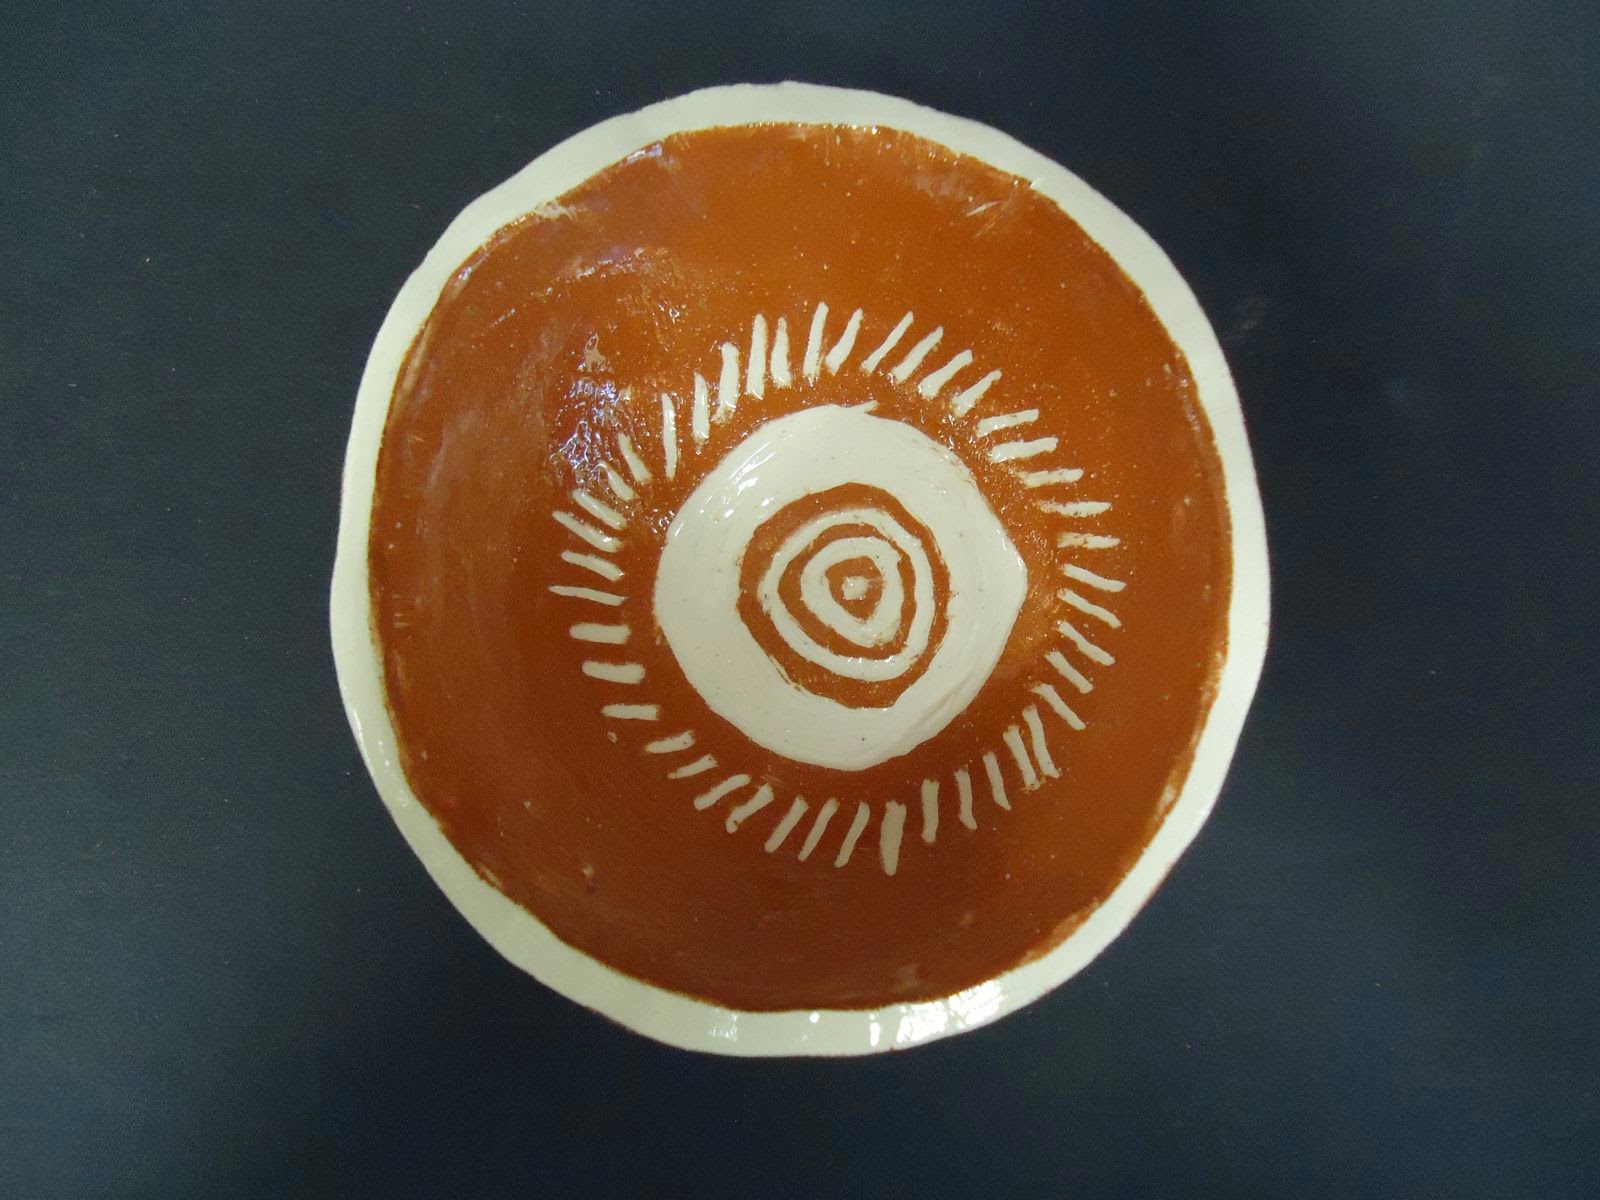
I love these sweet pots done by Amanda Loidolt, my student teacher.  She had the kids make coil pots out of white clay and added red clay slip to the outside.  They carved in to create their design.  This is a technique called sgraffito.  Amanda learned that 10 days of clay between the two classes is a lot in a 45 day art quarter.  Good learning lesson:)