Showing posts with label Station. Show all posts

Sunday, November 13, 2016

Careers in Art- Toy Designer


The third grade continues on their #CareersInArt series. In this lesson, I have asked my students to become toy designers. They were pumped for this challenge. 


I am always surprised what stations the kids are drawn to.  Each class is different too... Some classes will have lots of kids at the shadow puppets and the next class no one will be there.  I really can't tell why students choose what they do, but it's fun to observe. 


The puzzles were amazing.  When I talked about this option I really stressed craftsmanship.  The kids took a lot of time on their image and I found most of them didn't have time to cut the puzzle out. The best part about this was in our review the following week, several students explained that they made puzzles for family members.  I love when you can teach kids something they can create as a give for a loved one... it's empowering to them.


The collaboration I saw at the shadow puppet station was fun to watch.  I loved hearing the stories they were creating.  Even more exciting was the problem solving.  I found that students had to discover how to create details inside their creations without drawing.  Almost all students would draw a face on their figures and then wonder why it wasn't showing up on the shadow.  It always took some peer teaching and discovery to understand that they had to cut out the details in order to let the light shine through.  This was a great station for discovery.


I have an overwhelming amount of cardboard tubes in my storage area.  This is truly treasures for my students. They loved the freedom to create using colored papers and any adhesive that worked best for them.  This station was filled with creativity and energy.  Each toy had a story behind it.  The toys were played with as they were being created.  The kids were so excited... SO Excited... to bring these treasures home.  This was another lesson that students said they created at home. Always a win when they make it at home.


The last station was the IKEA stuffed toy design.  I explained to the class that they could design a stuffed toy and IKEA will choose a couple to actually produce and offer in their store for sale.  The hard part was that I was not able to submit these designs.  So I created a little worksheet that explained the link to parents and allowed them to submit the designs to the company.  Actually, it took a lot of pressure off me.  I really didn't think that any would have been entered, but I saw on Facebook from one of the families I work with that yes indeed... one of my student's works are now in the competition! How exciting. If you would like to vote for Olivia's owl (image below) Please visit the website (click here) Search for Olivia's work by typing in her number = 289105.

Sunday, October 16, 2016

Balance: Choice-Based Learning and the National Arts Standards


After posting about my 'Careers in Art' series recently (click here). I received the following comment below from Kellie Determan.  
It sounds like Kellie is exactly in the same place I found myself about two years ago. Two years ago I started watching the posts from TAB teachers and loving the concept of an Art Studio versus an Art Class.  I would offer a little choice in my class and post it to the TAB groups on Facebook.  I would get comments from teachers suggesting that what I was doing was not TAB... not even close. I was trying but I was taking baby steps... such small baby steps.  I would allow my students to choose the color of paper, or between two mediums but we would still all do the same lesson. Sometimes I would let them each choose their own subject, but make sure that they were still doing the same process. I think this is great.  It's a way to give choice in your classroom at some level.

Here is the deal... it's all TAB... check out the bold comment from the TAB website

I don't consider myself to be TAB.  I might call myself Directed Choice-based.  I'm totally seeing the benefits of choice as also suggested on the website under 'what is TAB'. One of the big ones is this approach to teaching has allowed me to be available for individual and small group teaching and support (see previous post). When I'm instructing, I teach to the masses, not the student. In this choice-based learning, I 'm available to the students as a resource. 

So back to Kellie's question, how do I explain what I'm doing to others who come into my classroom and see the 'fun' happening?

There is a structure to my class.  Yoga Calm calls it Calm>Active>Calm (see more on Yoga Calm by clicking here).  This is the format I have been using in my classroom for years.  I bring students into class and have a class meeting for the goals of the day.  We usually watch a flipped video and then they are asked to go make their choice of how they meet that goal. There is great activity in the classroom, we will end with a gallery walk, clean up, and a Bit-O-Bio so kids are back to calm again.

I have an 'I Can Statement' posted on the board... but instead of calling it a "I Can..." I call it a challenge or a goal.  The kids look at my classroom as a puzzle to be solved... I love this because it allows students to understand that there are no 'right' answers... They get to solve the problem in the way they choose for the day.

My goals given to the students are developed from the National Standards. Let's just look at the Architecture Lesson I recently posted on.  I'm doing the 'Careers in Art' series with my 3rd grade.
This whole series highlights the 'Create' standards above... Generating and organizing artistic ideas using a variety of processes and materials. These first two standards are covered with this one lesson.  I will be focusing on 'Refining and completing' in an upcoming lesson that I will have every trimester where they do a little reflection on the careers learned about thus far. So no... each standard is not met with every lesson. 
Again, present is not covered as much in this one lesson. This will be a focus for a follow-up lesson when students reflect on the process of being an architect and the other careers covered in class. 
Connecting is the main reason I'm covering 'Careers in Art' with my 3rd grade.  These broad standards are so big for my brain to wrap around.  I really focused in on the personal connections, the observation of surroundings and relating ideas and work with society.  This strand of the standards is why I have developed this whole series.  

As art teachers we tell our students that Art is all around us.  But do we show them how? So by giving students Careers in Art, they can see where, how, and who are the creators of the Art that is all around us. They can also relate that back to themselves.  A student might not feel they are an artist if they are not 'good' at drawing, or painting, or whatever is being taught in your Art classroom... If the definition of what an artist is broad, they might find a place where their skill set fits best. They will walk away from your class knowing that everyone has Artistic skills and it can be developed.  

Is this the 'right' way to reach the standard of Connecting?  It's one way. Teaching is just like a TAB room... there are so many solutions to the same problem even if our administration would often want us to be uniformed.  There MUST be fluidity to teaching in the Art Studio. 
Finally, responding.  I have the students do a 'Gallery Walk' almost every class period. This is an informal way to start the conversation of responding to art. We celebrate how we each reached an answer to the problem. There will be a separate lesson where interpreting and evaluating is the focus.  These were not the goals of this lesson at all.  

By the way, if you love this format of the National Arts Standards above, click here for the previous post of where I got this and so many more amazing resources for this year.  It's from Laura Lohmann's Art Teacher Planner.  That is a solid resource for sure! 

This is how I have found balance.  I still believe that students in elementary school are developing the building blocks to creating art.  This is why I give students a focus, allowing them to build their skills.  By 5th grade, most are actively applying their knowledge and the problem solving is much more evident in their creations. 

Wednesday, August 17, 2016

Digital Station- Crochet Chain


I have another self-paced lesson to share with you.  I learned how to crochet a chain when my three-year-old daughter taught me several years ago.  Yep, my kids went to a Montessori pre-school and one of the many skills that they learn there was how to crochet.  I have necklace after necklace of crochet chains. 


I still bring crochet hooks along on long trips.  I recently brought a couple along while camping with family.  It was a hit and a lot of fun to do around the campfire. 


Crocheting a chain is a gateway to bigger and better crochet projects. My kids at home and students at school love it.  I hope that it will fit well in your classroom too.  Check it out, the lesson has a QR code and URL to bring students to a video.  This VERY short video gives students an explanation of how to make a chain.  Students can pause and replay this lesson to help better understand the mechanics. 

Click here for the TpT Crochet Chain Lesson


\

Wednesday, April 20, 2016

Kindergarten Students Flipping their Own Instruction for Printmaking


Yes, someday's I'm not totally prepared for my class.  I like to have a flipped video prepared for my kindergarteners.  When doing stations it gives them information and expectations really fast for all 6 options for the day. Doing this allows my students to get to playing (I mean learning) faster. I knew I was going to print with my students, but I didn't have the videos done. 


As I explain in the video above, this is what I ended up doing for the day. Instead, I assigned each student a station and gave them a mini lesson and some time to learn it.  Then I revisited the stations and recorded a student introducing the directions.  I looped this together and showed it to the rest of my classes.  It was PERFECT!! 


After the fact, I recorded the 'What is Printing' video above.  PS... If anyone has a better explanation for printmaking for k's, please share.  I'm always at a loss for the words to use for these little buggers to give a definition for printmaking. I digress... I showed the intro to printing above and then had the students set up the stations by handing out the gems (see gem post). 


After the kids have a little break from setting up stations, I ask them back to the carpet to show them the flipped videos from the k's.  They loved seeing kids their own size, and in some cases, they even knew the now famous teachers.  Even though this total intro to the stations was a total of 10 minutes long (I try for 6 minutes), the k's were still actively listening. 

Friday, November 27, 2015

Shape Scapes Station


It's amazing how each class gravitates towards different stations.  The kids in this class LOVED to play at this station.  They were extremely creative with the 'Shape Scapes' that they created.  This station was inspired by play and watching my students. 


Monday, November 23, 2015

Learning Art Through Stations


What are these gems for? Let me tell you!


I started running a choice-ish classroom this year.  Due to the schedule I have this year, I'm running K's, 1st and 2nd grade using stations.  They come into the class and have a mini lesson on the concept of the day.  As you can see from the above and below images, I set up stations according to color of tables.  Most of the time I show video's of the station options of the day. The stations relate to one of the concepts learned in each grade.  I try for two stations on each concept.   As you can see... I have simplified the stations (comparing the 1st and 2nd photo of stations).  Above I was showing all of the supplies and examples. It was getting a little too cluttered so I simplified it as you see below. 


That tells them what the stations are going to be but I have to set them up.  For the first several weeks of this, I would take my lunch and set up the stations.  It was a lot... I asked myself why am I doing this, I should train the kids to do this.  My goal is for my class to be able to run with, or without me there. So I set up a cart as you see below. 


Each tray has the supplies for each station.  These trays coordinate with the table colors. Now I check the cart once a day to see if it has the correct supplies.  One place to check, one place to clean up.  It's working out nicely.  I store it in my kiln room... pull it out before my first choice class and wall'la! That's all I have to do...  Not bad at all.


So now to get the tables set up.  I have taught the kids how to prepare a station.  How to get it presented and set up.  Set all the materials out and make it look inviting. I hand out these gems from the gem jar.  You guessed it they coordinate with a color table and therefore the holder of the gem, sets up that station. Kids are so excited to get a gem.  They put the gem back in the gem jar when finished and join the group in play and discovery.


Everyone helps with clean up, but the gem holders are asked to return to their stations to make sure it's ready to go back onto the cart. This system has taken several weeks to get smooth and I expect to see more growth in this process as the weeks continue.  


Sunday, November 15, 2015

Shadows Shape Station


Wonderful station that was truly intriguing to my students.  I set up two overhead projector under a table and placed some paper over the edges. The students were asked to make free-form shapes to project onto the 'screen'. 


In addition to this video, I learned that I needed to have more rules in place for who get's to use the overhead projector, and for how long.  I would show them that they must cut a shape out, and get in line.  The line was watching the shadow show.  When they got to the projector, they should set the timer for 1 minute.  Students can have as many times as they wanted as long as they got back in line. These rules worked out well and kept the peace. 


Tuesday, November 3, 2015

Leaf Creatures Station


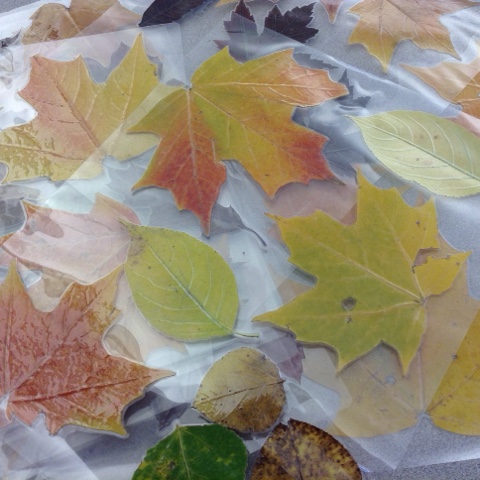
This was such a fun station for my K, 1's and 2's.  Students were asked to look at the book Leaf Man by Lois Ehlert.  There was lot's of inspiration from this book to create a leaf creature.  The video was all that the student needed to be very successful when choosing this station to work at.

Here are a couple of tips I have to creating this station successfully.  First you need to be in an area that has beautiful leaves in the fall.  Or, I guess you could press any kind of leaves any time of the year.  So... what I'm trying to say is you need some leaves. 


Pressing the leaves made the leaf creatures easier to make.  I found cutting the stems off  the leaves first helped in the pressing process.

I tried it day one with no pressing... changed to pressing the leave.  Day number two pressed the leaves but they would crumble under the delicate hands of these young artist. I used contact paper on day three to protect them... the contact paper fell apart.  Day 4 I was explaining the problem to a fellow teacher who suggested using the Purple Cow.  I said... What is this you speak of, a cow which is purple.... (no, I didn't really say that).  I was shocked to know that I didn't know about this magic machine.  It's a little laminate machine that has a bit more sturdy seal and worked perfect for this situation. 


Once they were done, I cut around them and they all survived.  Only time will tell if I need to do this each year of if these will work for next year too.


Wednesday, October 21, 2015

Pumpkin Pound Station


My K's and 1's are have had a blast this last week working at this station called Pumpkin Pound.  I found this wonderful idea on a post on the blog called Scrumdilly-do.  I had to give it a try.  I found the hammers at Walmart for $1.50 ish.  The golf tees came in a 30 or 40 pack for a couple bucks too.  Just the right price for this station.


Students used pliers to get the tees out of the pumpkins.  This worked better the more times the pumpkin was 'pounded'.  At the start, I had to help out with the removal of the tees... it was hard for these students little hands.


In the middle of this project we had a long break so out when the pumpkins (so they didn't rot in my classroom) and in came the squash.  I ended up liking this a lot better.  I divided the squash in half and they didn't 'run away' from the kids.  There was also a really cool discovery of tees through the back end of the squash.


There wasn't much left of the squash after these kids were done with them.


One thing that had to be added after watching the kids work for a while was safety goggles.  These were a hit!  The students were excited to dress for the work at this station.


Here is the video I had created for station instruction.  I have found that by teaching it one or two days, I get the kinks worked out and I can use kids instead of having my face on every one of these station videos. Win/Win!