Showing posts sorted by relevance for query nest. Sort by date Show all posts

Sunday, May 8, 2016

Clay Nest for a Mom Who is the Best!


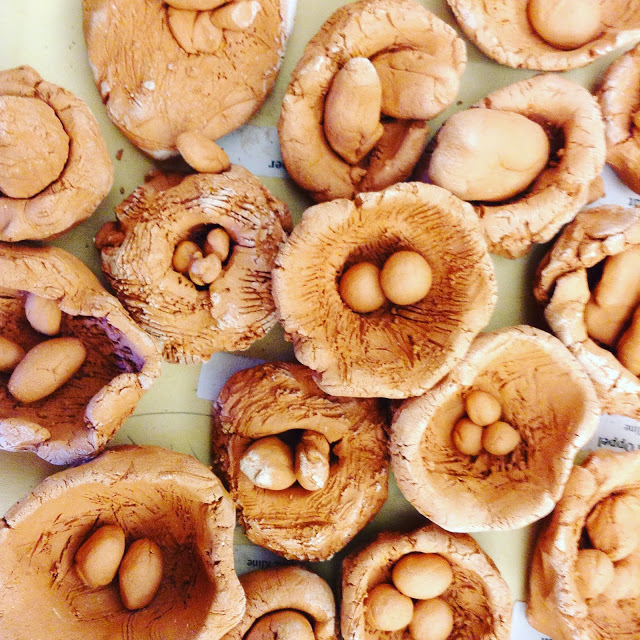
Kindergarten students created these little clay nest with our Art Teacher Swap.  in 2015, I posted about different clay nests (click here).  This year, I simply didn't have time to paint the little eggs, so we packaged them up as is and sent them home to mom.


The nest had the students initials on the bottom but K's don't seem to understand what that means.  To set up for clay, I had labels made and they were placed on a sheet of paper. That way, when the kids were finished, they would place their nest on their name and a volunteer would write their initials on the bottom of the nest.  I used this for distributing as well.  I had to line up the name with the nest so I could call each student by their name to work on the nest as the rest of the class was doing stations.


I prepared these little cards before the students came in on tag board.  I used rubber bands to place them on the packaging.  The bands wrapped around the tissue paper to hold it all together.


Each student would come up to the table that I was working at and sign their name to a card.  They would talk about the clay and how it had changed.  They could hold it and experience the hard, rough little next and smooth eggs. It was so much fun to have that one on one time with each K to watch their eyes light up as they discovered what happens to clay, how it changes, and what it feels like after being fired. 


One of the things that I was sure to do when talking about these nests was offer the opportunity to make these for their mom .  I know that there are some students who don't have a Mom at all in my K classes so I didn't call this a Mother's Day gift and I had extra cards with no writing on them if they wanted to give these to someone else. I did have all students wrap them up because it kept the eggs all together and made it a little more safe to travel home with.


The packaging turned out so sweet... I simply packed them all up and sent them back to the homeroom teacher to distribute on Friday.  K's were very excited to bring home these treasures to their Moms. 


I saw this Instagram post from mrsnashgnarra. I thought it would b e a perfect card for next year to pair up with the clay nests. I might try to incorporate something like that or I have done this nests before with great success! This would have been a nice one to pair up with this project as well (click here) 

Sunday, April 30, 2017

Clay Nests


In our Art Teacher Swap last year, Sue Davies did these sweet little nests with my students. They were so sweet and totally perfect for these young Artist that we chose to do them again (click here for previous post).   This year Sue did some videos so my students could watch them ahead of time and have some prior knowledge.  This allowed for more work time in the hour of clay.  First Mrs. Davies shared about pinch pots. 


Then how to take that pinch pot and turn it into a nest.


This year I allowed the students to use tempera cakes to decorate their nest.  They spend about a half an hour 'getting rid of the white spots' of the clay.  I allow them to use any color they want. When finished, they bring it to me and I ask them to write their name on a name tag.


There is always a bit of a line so they simply place their next on top of the name tags and finish the class time play blocks. I then take the 15 minutes left of class to wrap these little treats up in tissue paper and rubber band their name on the top.


By doing this wrap around the nest, students can easily bring them home without losing the little eggs.  I give the whole batch to the homeroom teacher who I think is going to be handing these back to students right before Mother's Day in case they want to use it for a gift. 


Really successful little project!! They don't take a lot of room in the kiln.  They are all unique.  They are all successful. And they are the sweetest when finished.  Put it on your list for next year as a must do! 

Thursday, October 8, 2026

Goal or Soul? Finding Balance in a New Creative Chapter

As I’ve been navigating this new empty-nest season and settling back into the rhythm of MiniMatisse, I’ve found myself asking some big questions. We spend so much of our lives chasing deadlines, lesson plans, and milestones. But somewhere along the way, we have to pause and ask: Are we chasing a goal, or are we feeding our soul?

I recently put together a short vlog exploring this exact thought—how we balance the drive to achieve with the deep, quiet need to simply create for its own sake.

I'm just working on finding myself, feeding my soul, and staying connected.


This is my 'why', and the purpose of this blog. I'm grateful to have found my focus again and will continue to adjust along the way.

Nic


Tuesday, October 6, 2026

Sweet Treats and Studio Sweets: Fun Art & Baking Projects from Home

2026 Halloween Cookies

Hello again, friends!

As I’ve been settling into this new rhythm of an empty nest and diving back into the creative life here at MiniMatisse, one thing has become abundantly clear: my art studio sometimes is my kitchen.

While I've been loving sharing classroom art education ideas and exploring the world of urban sketching, my Art Home Projects & Studio Life pillar is really where I get to play with everyday creativity. Lately, that has translated into some fun, hands-on decorating projects right in my own kitchen—combining sweet treats with artistic detail!

I’ve put together a series of quick, bite-sized YouTube Shorts showing how I bring these little creative visions to life. If you are looking for a fun weekend project or just need a quick dose of inspiration, check out these shorts over on my YouTube channel.

1. Spooky-Cute Spider Cookies

Get into the festive spirit with these fun, easy-to-decorate spider cookies! Perfect for a seasonal gathering or just a playful afternoon in the kitchen.
👉 Watch the Spider Cookie Short on YouTube

2. Classic Painted Pumpkin Cookies

There is something so satisfying about getting the icing details just right on a classic autumn shape. Watch how these pumpkins come together layer by layer!
👉 Watch the Pumpkin Cookie Short on YouTube

3. Fluttering Bat Cookies

Simple outlines and dark details make these bat cookies a fun, striking project for any cookie artist.
👉 Watch the Bat Cookie Short on YouTube

4. Spooky Ghost Cookies

You can never have too many friendly ghosts! See how a few simple icing flood techniques bring these little spooks to life.
👉 Watch the Ghost Cookie Short on YouTube

5. Fun Witches Hat Cookies

Catch more behind-the-scenes decorating fun and creative troubleshooting right from my home workspace!
👉 Watch the Studio Short on YouTube


Creating things in my own space—whether it's sketching on location or decorating cookies in the kitchen—has been such a wonderful way to feed my soul during this new chapter. Bonus, I was able to send these cookies off in a 'cookie kit' to my college kiddos.

Head over to YouTube, watch these shorts, and give a 'like' to your favorite design.

Warmly,

Nic

Friday, May 28, 2010

Eggs in a tree...

I feel bad because this idea I got off from a blog but lost the information as to which one. If it was yours, please let me know. Anyway, I did this with my K's recently to talk about recycling. We used magazine clippings for the nest. They loved it:)

Update: I think I might have found the link to this ideas... Thanks to Mrs. Smith! Check it out!

Update again: Katie from Art Teacher Adventure has a posting most like this project. She has some beautiful photography to go along with her lesson. Be sure to stop by.

Monday, February 19, 2018

#Crush on the Medium Clay


Clay... Wow, this is a love/hate relationship with this Art Teacher.  Many of you know that I have developed an allergy to clay over the years. It is such a bummer because I have LOVED to work with clay in the past. When I was pregnant with my second child I started getting sick when working with clay. I would get cold-like symptoms and then a swollen face. This got worse and worse every year until I one day could not open my eyes because they were so swollen and when they were healing they started to crack and bleed... yep, it wasn't pretty.  

I have created with clay several years before the issues and I have had Artist in Residence and Art Teacher Swaps since so I'm excited to share some SOLID clay ideas in this post. 


I adore this bug project that I did back in the day. The kids loved it because it was created with their handprints and... get this... They created the texture with a shoe print. Yep, this is such a fun project here is this previous post. 


This next lesson I have done several times with kindergarteners. Each time I changed my practice just a little. I love this clay nest lesson and I love sharing it because it's often successful! Here is one post about this lesson that requires no/little finishing touches. This other past post has some finishing touches, like paint, but gives a very different look to the similar lesson.


Moving up to 1st grade...  After learning how to make a pinch pot in Kindergarten, this concept is brought to the next level with a 'Clay-D-Bug'. Students make a pinch pot and add a head.  Embellishments to this project have been wire, clay tiles, paint, and glaze.  Again this project is one that I have done several different ways. There is some GREAT videos tutorial teaching students about clay and creating a clay bug by Sue Davies. 

When finished we have done a couple of extensions such as 'clay bug terrarium'. I also have some ways to reflect on their artwork using Seesaw, click here.


Here is a more advanced pinch pot done by a student teacher, Amanda Loidolt. This was a sgraffito finishing and I thought these pots turned out amazing! Check out more examples here. 


Still, on the pinch pot theme, we did these adorable 'not so angry birds'. That is when Angry Birds were hot so it was fun to jump on the popular culture bandwagon at the time. My posts have definitely developed over the years but here are a couple more images in this previous post.


Here are two ways to bring the pinch pot to a new level! Talking Rocks are so much fun!! I have some great instructions on this previous post. Using a similar method, I have made these piggy banks with my personal kids.  They are treasures in our household. 


Here are some slab projects I have done in the past as well. Click here for the post for the pine cone relief project. Here is a short project post on the mosaic heart.  I really loved the sushi plates the 3rd graders did a couple of years ago. I have three posts about the sushi dishes; clay plates, fiber sushi rolls, and games we played with the rolls. 


I can't teach raw clay anymore, but I can do the finishing work with my class. I have a few ideas of how to finish clay with glaze alternatives in this post.  Take a look at some of these end results to pick out your next finishing technique might be. 


We are lucky to have a kiln in every school in our district.  I adore the medium and the kids to too... That is why I work so hard to give students the opportunity to work with clay at least once every year.  I'm excited to announce that this year we will be having Tracy Hare, a local Art Teacher come teach my students for a digital week this year. We call it clay week and you bet you will be hearing about it right here in the near future.